|
PORTABLE DENTALX-RAY MACHINE
(Dental
surgery microscope,
Dentistry,
Surgical,
Operating,
Operation)
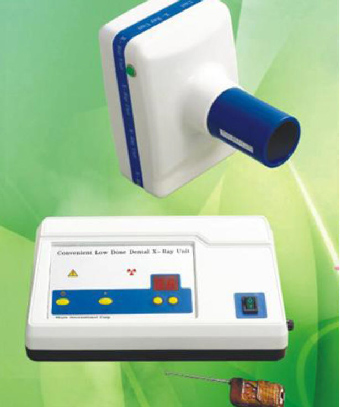
This model
combines the advantages of similar products(dentistry,surgical,operating,operation)found at home and
abroad; it eliminates the shortcomings of the on-frequency X-ray
machine (high current intensity and excess amounts of scrap
x-rays).The tube voltage frequency of this machine is 30 KHz,and
the tube current is 0.1 MA. The radiation scope is at an angle
of 24 degrees, located within a distance (Surgical,
operating,
dentistry,
operation)
of 1.2 meters ahead.
This is an innovative Chinese design named the "Green X-ray
Machine."
All the
components of this product were originally imported to achieve
an acceptable tolerance required for the digital(Dental
surgery microscope,Surgical,
Operating, Dentistry,
Operation)controls and
the machine. By doing this, product perform ance is more stable
and reliable.
Using a Toshiba
0.3 x 0.3 micro-focus tube, the image is clearer and more
delicate. This machine uses components from well established
suppliers, allowing us to deliver to our customers a product of
high quality.
There are films
included for testing purpose and all the consumables can be
replaced by other similar products (Surgical,
Operating, Dentistry,
Operation).
There are vacuum
components and high-pressure parts inside of the machine,so for
your safety and the maintenance of the machine,please do not
open the machine. Service and maintenance
(dental
surgery microscope,Surgical,
operating,
dentistry,
operation)
should only be
performed by a trained professional.
The tube head is
equipped with excellent radiation-shield protection (except the
radial mouth,and tests have shown that the radial index is zero.
Safety is guaranteed.
Non-film
inspection
(Dental
surgery microscope,Surgical,
Operating, Dentistry,
Operation)
and storage can be realized when corresponding to a
sensor.
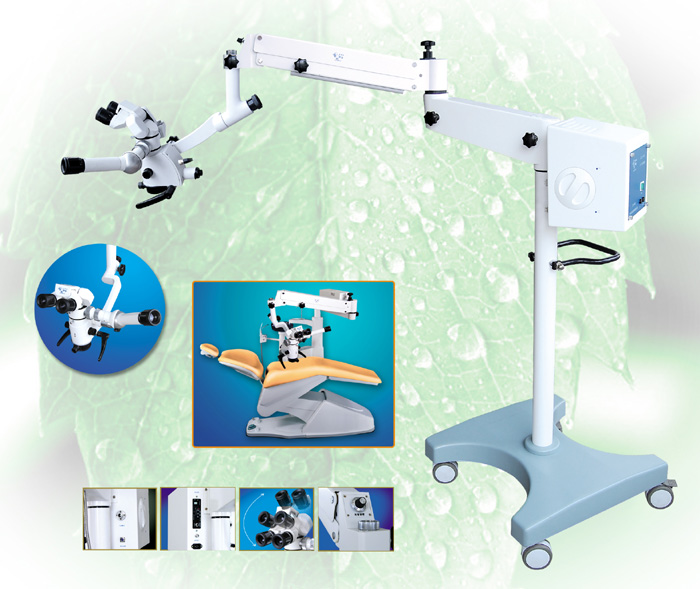
The Composition and Use of the Equipment (Surgical,
operating,
dentistry,
operation)
The machine
(Dental
surgery microscope,Surgical,
Operating,
Dentistry,
Operation)
is
made up of two parts: the main unit and the ball head. The main
unit includes the power supply,central data processing unit,and
the part to shock,enlarge,and feedback. The ball head is made up
by components with functions of controlling pressure and
frequency and ball tube,vacuum sealed part, etc. The shell is
from an injection mold with lead sealing protection.
The machine is
mainly used in dental
(Surgical,Operating,Dentistry,
Operation) clinics,to check out before treatment,and
to be used for comparison and confirmation during and after
treatment. It is an indispensable piece of equipment for daily
work within a clinic. Some examples of its use include checking
tissue structure,the depth of the root,the degree of
inflammation,and for the inner inspection of broken teeth.
While using a
small amount of radiation there is no need for protection
(
operating,
dentistry,
dental
surgery microscope,Surgical,operation)
.
Hospitals have purchased this machine to take films of fingers
and toes by the side of a patient's bed.
Operation of the Main Unit
(Surgical,
operating,
dentistry,
operation)
1. Upon receiving,open the box and check the product
(operating,
dentistry,
dental
surgery microscope,Surgical,operation)
for possible damage
during shipping.
2. Make
sure the fittings on the encasement list are packaged within the
box.
3.Connect
the six-core cable (of the Main Unit) to the joint of the ball
head and tighten the screw; Install the blue ray tube to the
foreside of the ball head,then tighten it.
4.After
the Main Unit and ball head are perfectly fit together,plug in
the international standard electrical(operating,dentistry,dental
surgery microscope,Surgical,operation)
source,grounding is
strongly recommended.
5.Turn on
the Power;the pilot lamp will be light up.During this time,the
digital tube of the main unit will show the fore setting time.
Now the equipment is in standby mode.
6.Setting
(Surgical,
operating,
dentistry,
dental
surgery microscope,operation)
the time (Skip to next step if unneeded) Use the "SET","+",and"
-" buttons to reset the time as follows: press SET,the pilot
lamp above is illuminated, the machine is now in the time
setting mode→then press "+" and" -" to set the time needed (time
range is 1-9seconds); press set again when the time is adjusted
the light lamp is off. The equipment is now in standby mode.
7.Put the
Tooth film plumb behind the tooth which is going to be taken
picture, and be as close as possible (the smooth side stick to
the tooth) (Surgical,
operating,
dentistry,
operation)
8.Keep the
ball head plumb to the tooth projection position; Have the ball head,tooth, and tooth film steadily mutually plumb(Surgical,
operating,
dentistry,
operation)
.
9.After positioning(Surgical,
operating,
dentistry,
dental
surgery microscope,operation)
,use the ON/OFF on the main Unit,the remote
controller,or the button on the touch head tube to take
pictures. The three methods have the same effect. (Notice:
gently press 0.5 sec to turn it on)
10. After
exposure to the tube,press the start button again (available in
three ways) in case of an emergency to stop shooting and return
to standby status. (At this point there was no output ray,so the
dental (dentistry) films can be used again)(operating,
dentistry,
dental
surgery microscope,Surgical,operation)
.
11.Repeat step
6 to reset the picturing time.To repeat the picturing
process,please repeat steps 7 to 9.
12. Turn
(Surgical,
operating,
dentistry,
dental
surgery microscope,operation)
the
power of the main unit off when the work is finished,press
POWER, making sure the pilot lamp is off.Don't keep the main
unit long in standby mode.
|